The Pre-Payment Plan Calculator
A custom calculator that sends your client's full payment plan directly into their GHL contact record. No manual entry. No forgotten details. In writing.
You will need Claude or ChatGPT alongside you for this build. You will also need a free Postman account at postman.com and access to your GoHighLevel account. Budget 2 to 3 hours for your first full setup.
This build has an Inbound Webhook trigger inside GHL which is a premium trigger. It costs a few cents every time it fires. Make sure you have LC Premium Actions credits loaded in your GHL account.
What this system actually does
You fill out the calculator with your client's collection, deposit paid, discount, ZIP code, start date, and session date. You pick weekly, bi-weekly, or monthly. You click Calculate.
The calculator figures out how many payments they need, what each payment is, the full schedule with every date, and the cash option. You click Submit and it fires everything directly into their GHL contact record via webhook.
When a client calls six weeks later and says "I thought we decided on $122.94 every other week, not every week..." you open her GHL contact and show her exactly what was submitted, when it was submitted, and what the full schedule says.
It is in writing. In her record. Timestamped. Done.
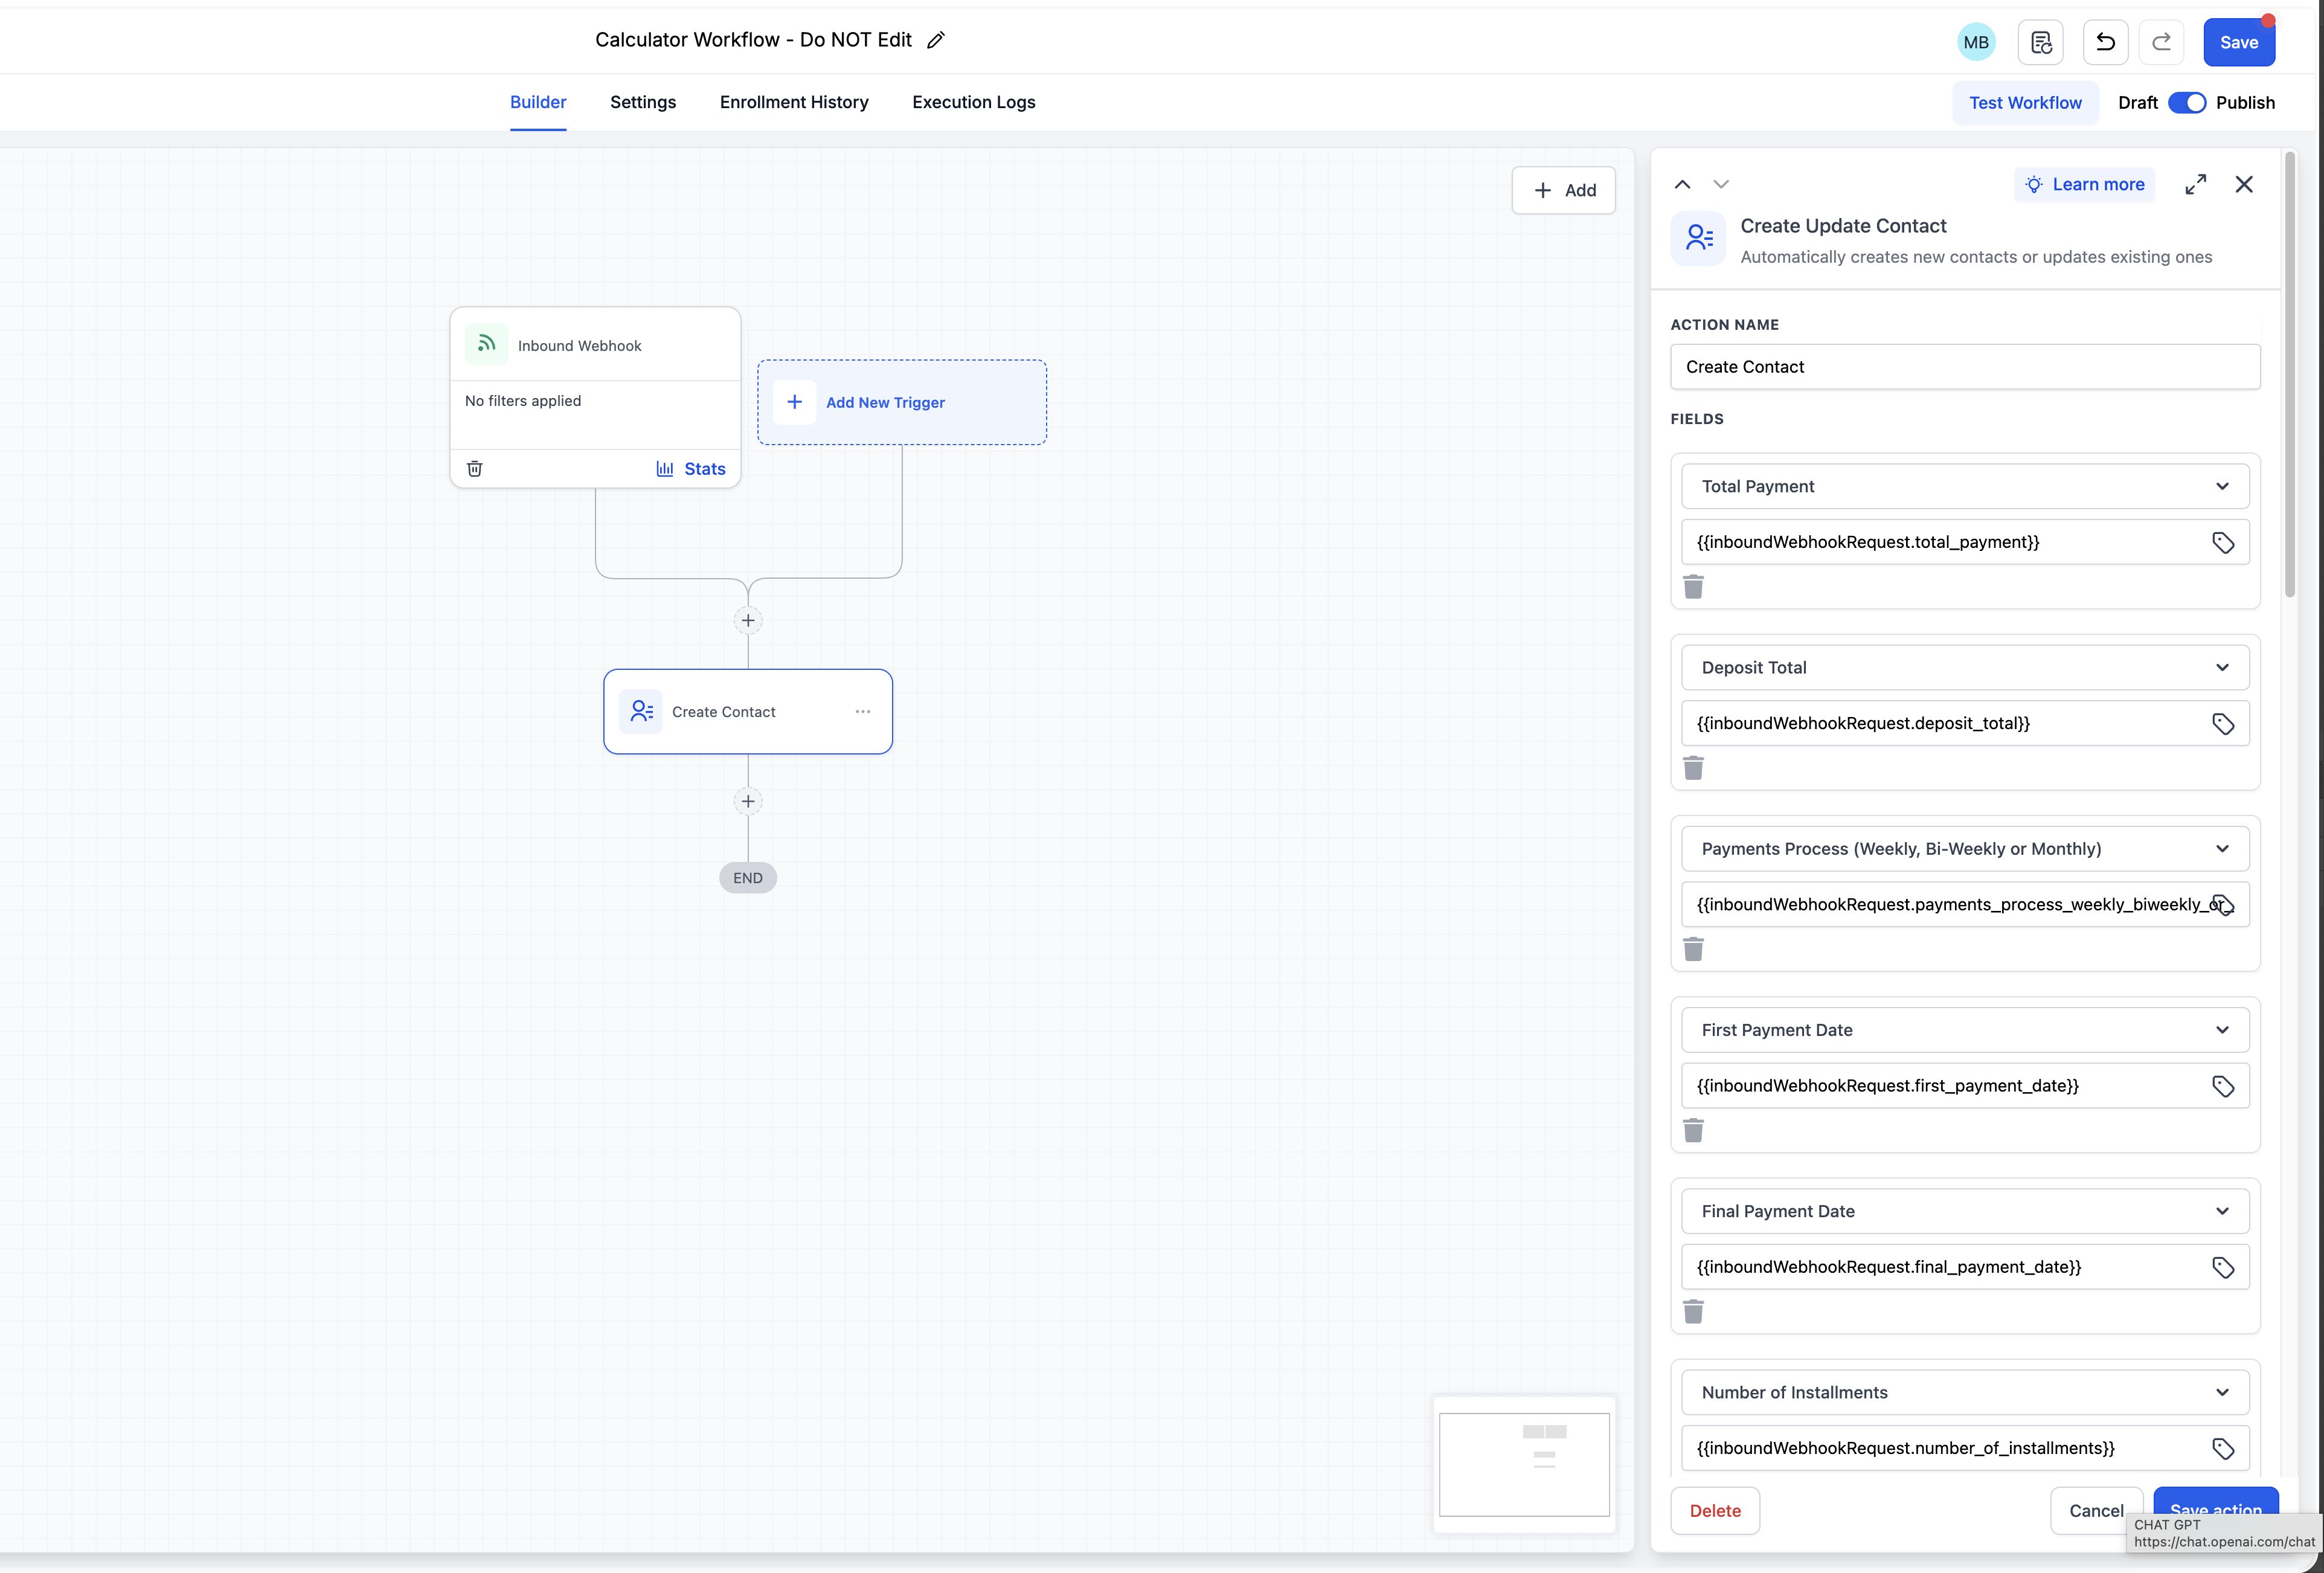
Every field... first payment date, final payment date, number of installments, frequency, amount per payment, full schedule, tax, deposit, total... goes into GHL as a custom field. That means it can pull into your contract automatically.
Setting up your GHL Custom Fields
Before anything else you need to create 14 custom fields inside GHL. These fields live on the contact record and hold your payment plan data. When the calculator submits, it fills them in automatically.
A custom field is a container you create inside GHL to store specific information about a contact beyond the defaults like Name and Email. You name it, you create it, GHL stores it on that contact record forever. Things like final payment date, number of installments, the full payment schedule.

How to create each field in GHL
- 01In GHL go to Settings → Custom Fields
- 02Click + Add Field
- 03Set the Field Type to Text for all 14 fields
- 04Give it the name exactly as listed below — spelling matters
- 05Click Save
- 06Repeat for every field in the list below — all 14
Create one field for each of the following. Use these exact names.
Adding fields to your contract
Once the custom fields exist and the calculator is filling them, you can pull them directly into your GHL contract template using merge tags. The signed contract will show the exact payment plan that was agreed to.
{{contact.total_payment}}
{{contact.deposit_total}}
{{contact.number_of_installments}}
{{contact.payments_process_weekly_biweekly_or_monthly}}
{{contact.first_payment_date}}
{{contact.final_payment_date}}
{{contact.first_payment_amount}}
{{contact.final_payment_amount}}
{{contact.prepayment_collection}}
{{contact.payment_schedule}}
"Client has selected {{contact.prepayment_collection}} with a total investment of {{contact.total_payment}}. A deposit of {{contact.deposit_total}} has been received. The remaining balance will be paid in {{contact.number_of_installments}} installments of {{contact.first_payment_amount}} each, processed {{contact.payments_process_weekly_biweekly_or_monthly}}, beginning {{contact.first_payment_date}} and completing {{contact.final_payment_date}}."
GHL replaces every tag with real data from the contact record when the contract sends. Susie Q signs a contract that has her actual payment plan in writing.
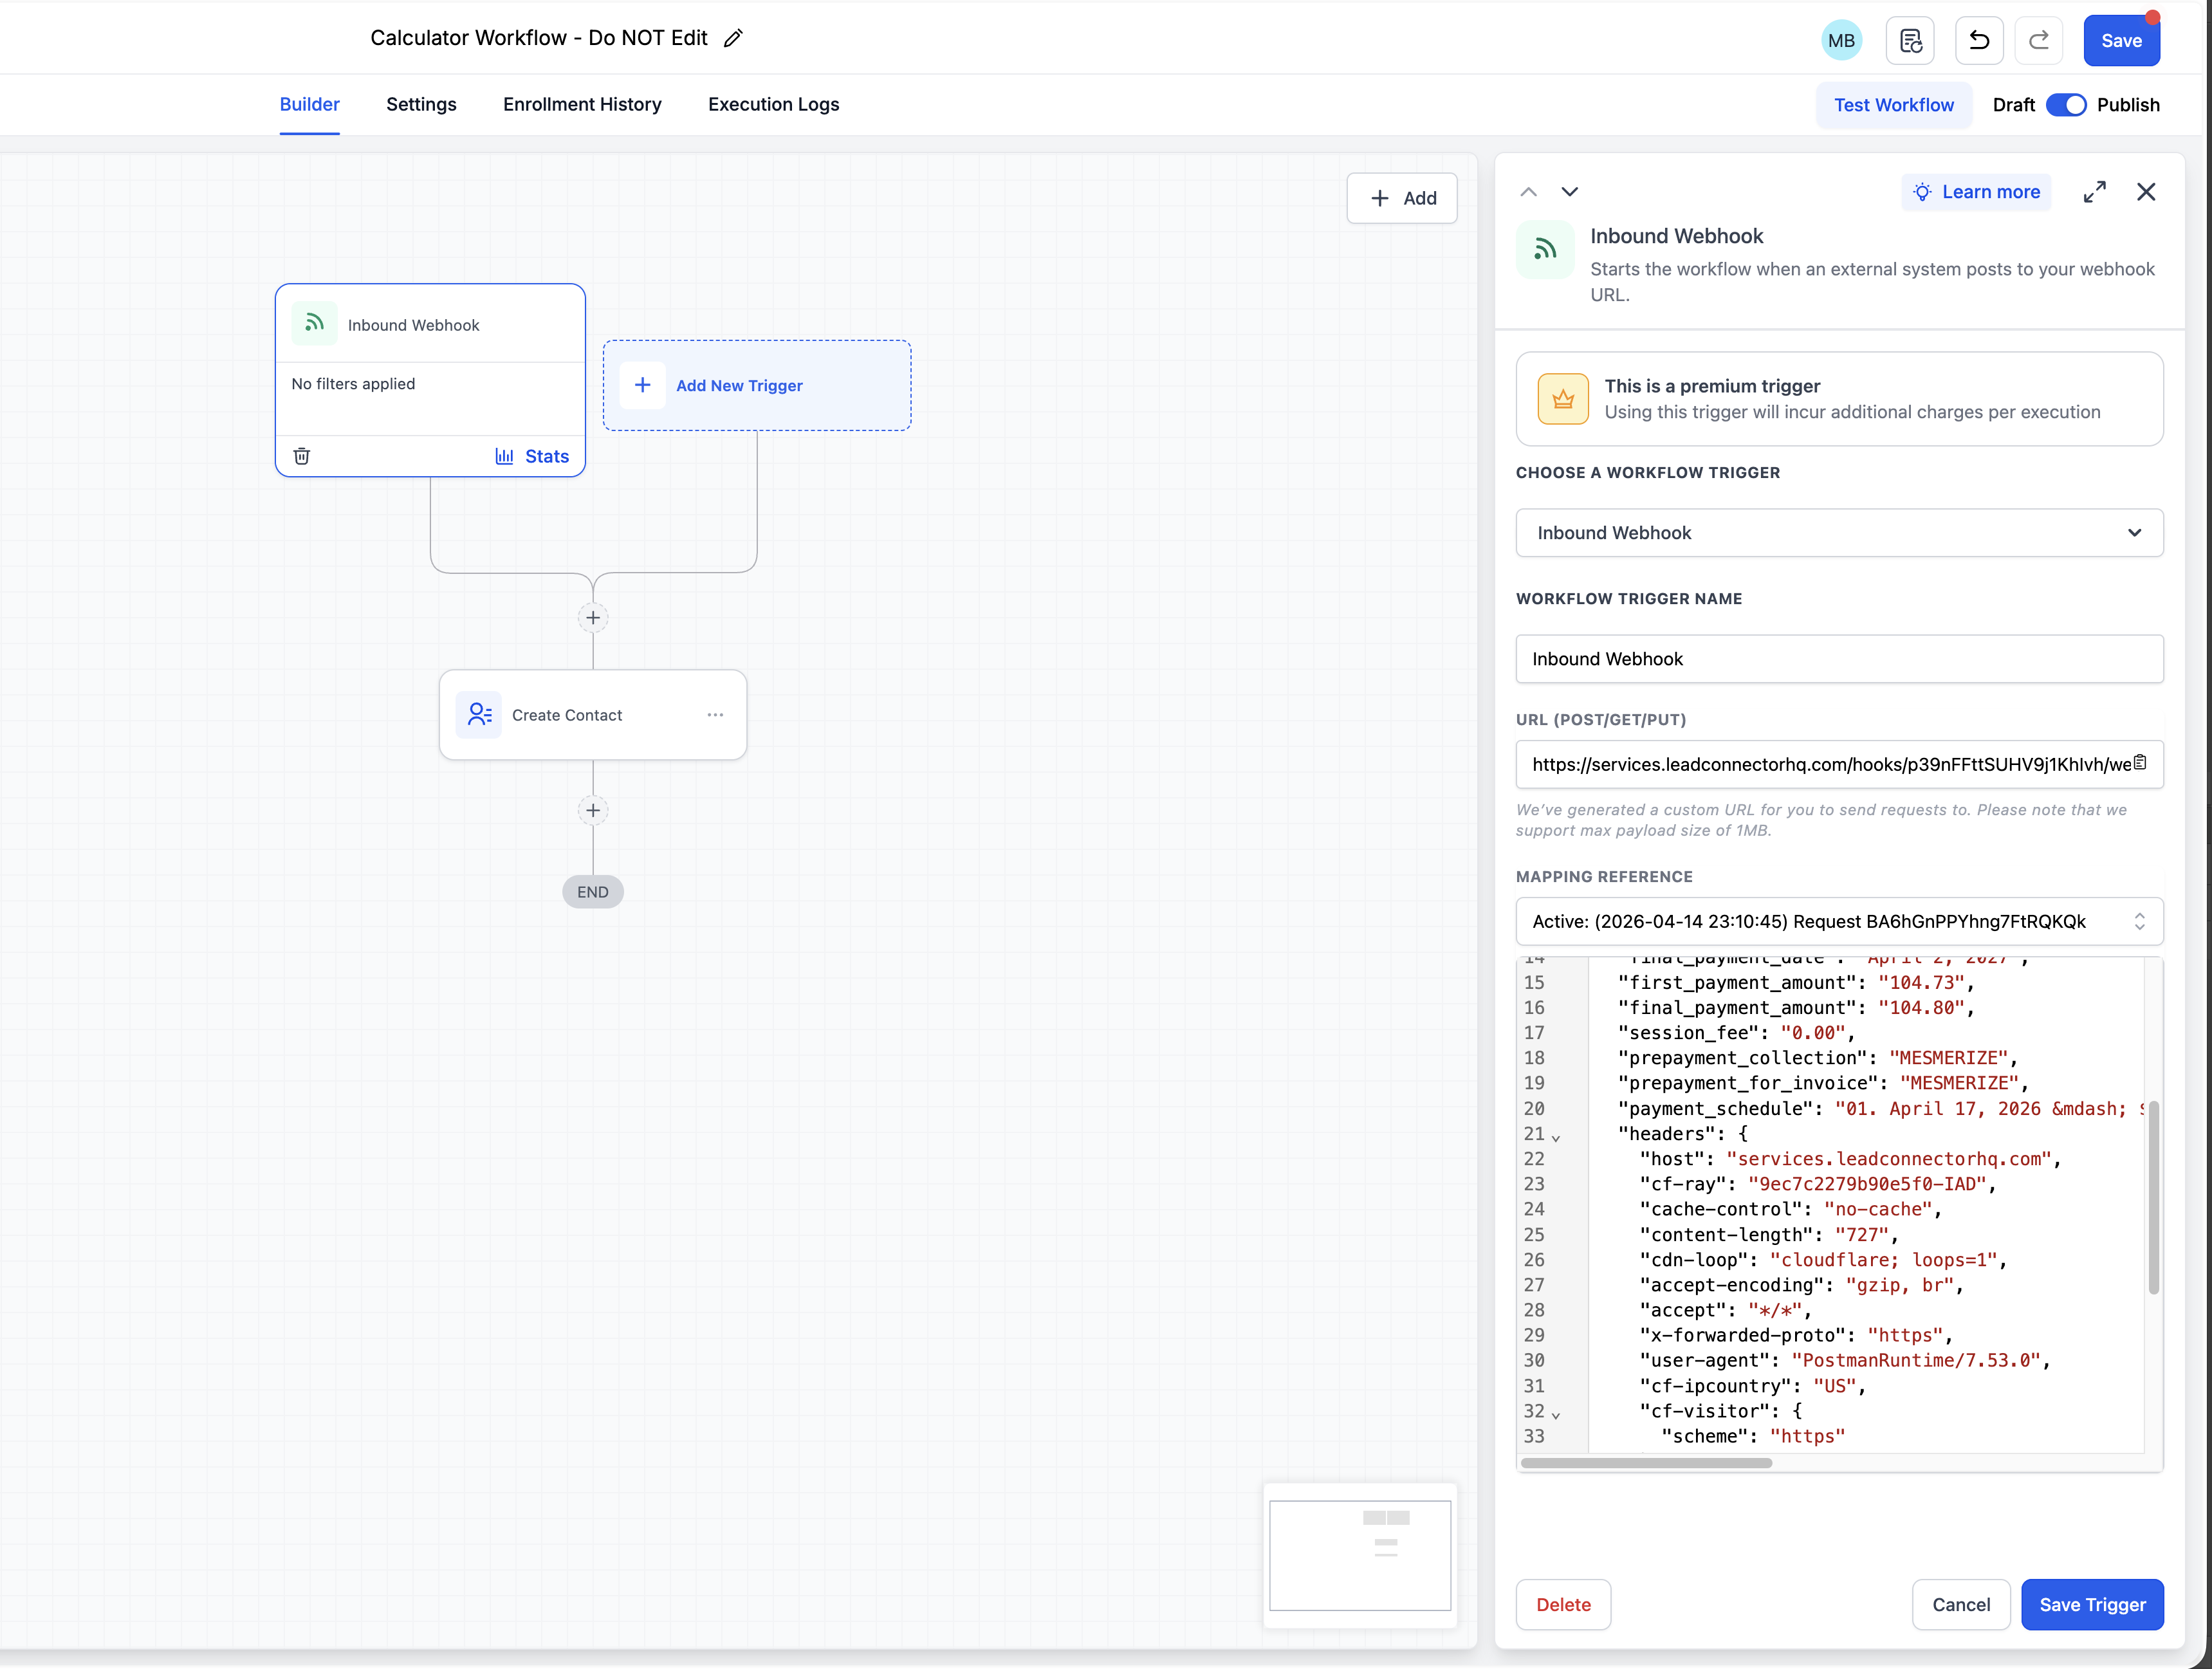
Creating the Inbound Webhook
The Inbound Webhook is a premium trigger inside GHL automations. Every time it fires it costs a few cents, billed through your GHL LC Premium Actions balance. Make sure you have credits loaded. It is not expensive for normal studio use but it is not free.
The Inbound Webhook is what lets the calculator talk to GHL. When you click Submit in the calculator, it sends all payment plan data to a URL that GHL gives you. GHL receives that data and writes it into the contact record.
- 01In GHL go to Automations → Create Workflow
- 02Name it something like Pre-Payment Calculator Webhook
- 03Click Add Trigger and search for Inbound Webhook
- 04GHL generates a unique webhook URL. Copy this URL. You need it in Postman and inside the calculator code
- 05Add an action: Update Contact Field — map each incoming field key to its matching custom field
- 06Save and click Publish — not just Save. An unpublished workflow will not receive data
Setting up Postman
Postman is a free tool that lets you send test data to a URL to confirm everything is working before you use it on a real client. Think of it as a test fire. You send fake data to your GHL webhook, GHL receives it, and you check that your custom fields fill in on a test contact.
Go to postman.com and create a free account. You do not need a paid plan. Ever.
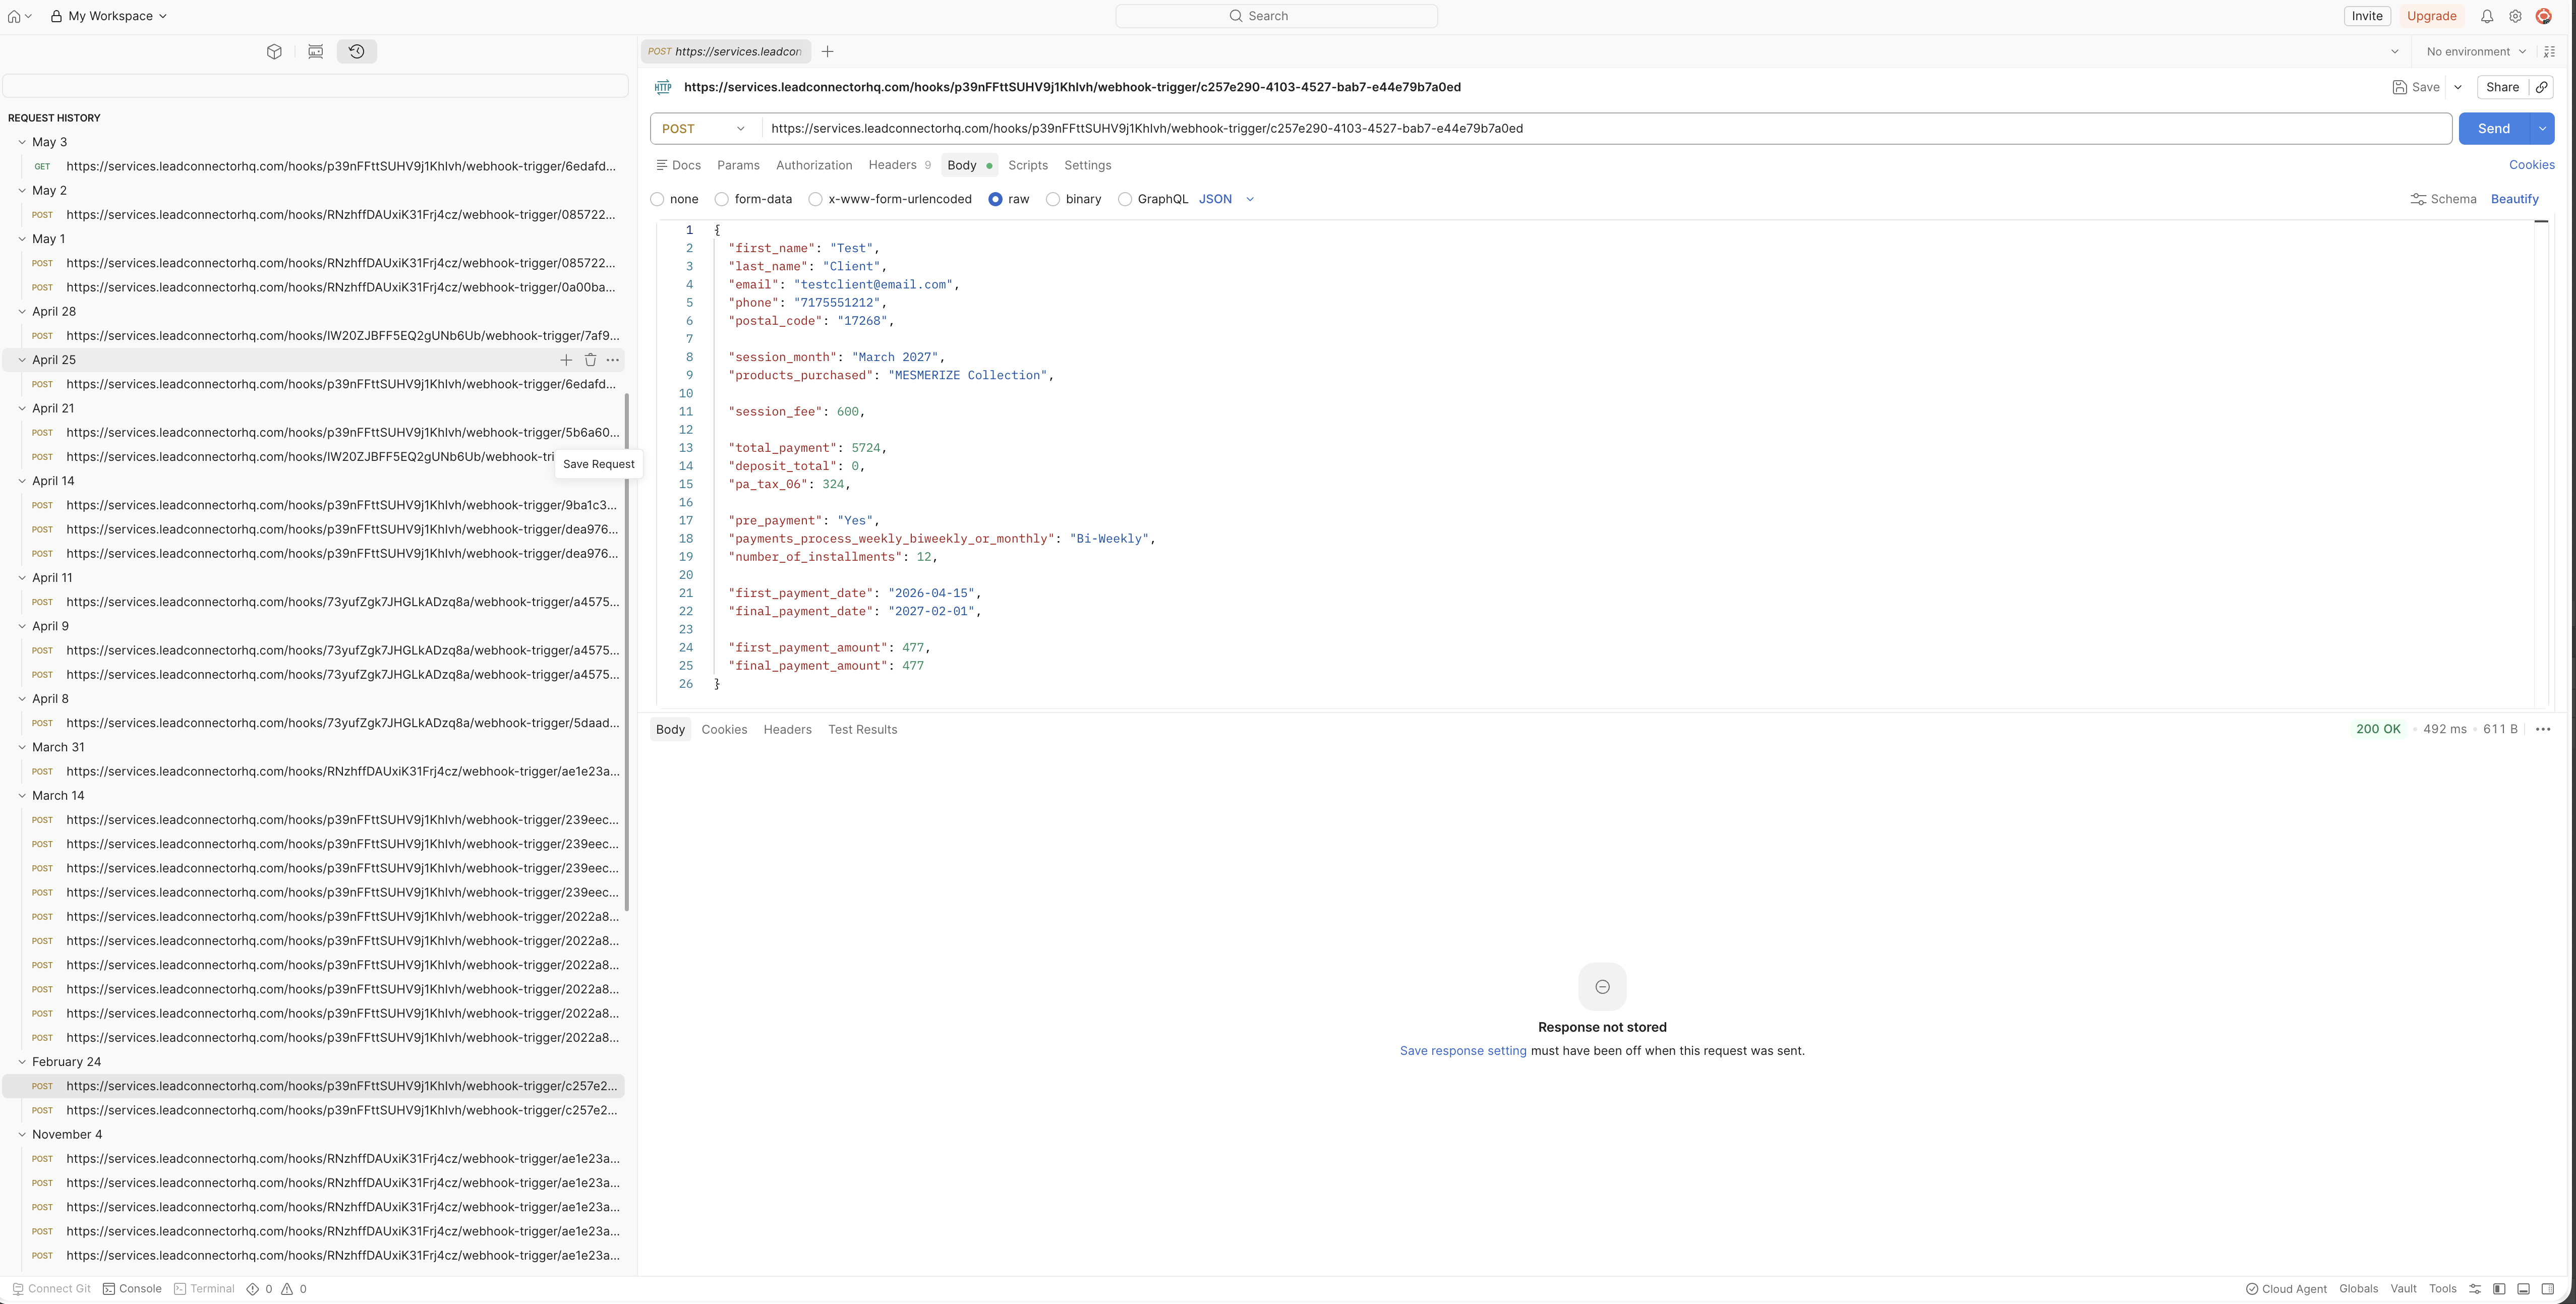
Step by step inside Postman
- 01Open Postman and click New → HTTP Request
- 02Change the method from GET to POST using the dropdown on the left
- 03Paste your GHL Webhook URL into the URL bar
- 04Click the Body tab, select Raw, and change the dropdown to JSON
- 05Paste the test JSON below into the body area
- 06Click Send — look for a 200 OK response at the bottom
- 07Open GHL and find your test contact — all 14 custom fields should now be filled in
{
  "email": "testclient@yourstudio.com",
  "first_name": "Test",
  "last_name": "Client",
  "phone": "5550000000",
  "postal_code": "17268",
  "total_payment": "4200.00",
  "deposit_total": "500.00",
  "pa_tax_06": "222.64",
  "discount": "0.00",
  "number_of_installments": 8,
  "payments_process_weekly_biweekly_or_monthly": "bi-weekly",
  "first_payment_date": "January 15, 2026",
  "final_payment_date": "March 25, 2026",
  "first_payment_amount": "462.50",
  "final_payment_amount": "462.50",
  "session_fee": "0.00",
  "prepayment_collection": "LUSH Collection",
  "prepayment_for_invoice": "LUSH Collection",
  "payment_schedule": "01 — January 15, 2026 — $462.50"
}
Check the URL. Make sure you copied the full webhook URL from GHL including https://.
Check the JSON. A missing comma, extra bracket, or mismatched quote will error. Paste your JSON into Claude or ChatGPT and ask it to check for syntax errors.
Check GHL. The workflow must be Published, not just Saved. An unpublished workflow will not receive webhook data.
The calculator code
The calculator HTML file is available to download from the sidebar. It is the exact calculator used in a real working studio. Here is what to customize before using it.
Paste the full HTML into Claude and say:
It will do every replacement for you in one shot.
Putting it in a GHL Funnel
The calculator is a single HTML file. The cleanest way to host it inside GHL is on a funnel page with a custom code element. This keeps it in your GHL account, behind your own domain, and only accessible to you.
- 01In GHL go to Sites → Funnels → New Funnel
- 02Name it something like Pre-Payment Calculator (Internal)
- 03Create one step and one page
- 04Open the page builder, delete all existing elements, add a Custom Code element
- 05Paste your entire calculator HTML into that code element
- 06Save and publish the funnel page — copy the URL
This calculator is for your use only. Do not share the URL publicly. It has your webhook URL baked in and fires directly into your GHL account. Treat it like a password.
Adding it to your GHL Dashboard
Pin your calculator as a widget on your GHL dashboard so you can open it in one click during any client conversation or sales call.
- 01In GHL go to your Dashboard
- 02Click Add Widget in the top right
- 03Select iFrame or Custom HTML Widget
- 04Paste your calculator funnel URL
- 05Resize to a comfortable size and save
Calendar reroute after submit
After you click Submit and the webhook fires, the calculator automatically redirects you to a booking calendar. This is useful for setting the next appointment immediately after finalizing a payment plan.
In the calculator code find this section near the bottom and replace both URLs with your real GHL calendar booking links:
if(redirect === 'inquiry_session')
  window.location.href = '[YOUR INQUIRY CALENDAR URL]';
else
  window.location.href = '[YOUR CONTENT CALL CALENDAR URL]';
Find your calendar links in GHL under Calendars → your calendar → Share Link. If you only use one calendar, set both URLs to the same link.
How to use Claude or ChatGPT
You will need Claude or ChatGPT for this build. Here are the exact prompts for each stage.
Every time you hit a wall — something is not working, a field is not mapping, a JSON error is showing — describe the problem to Claude or ChatGPT in plain English. Tell it what you did, what you expected, and what happened. It will tell you what is wrong and how to fix it.
You do not need to be a developer. You need to be willing to ask questions and follow directions.