The SecurePay Card Vault
Two GHL forms that securely collect and store payment card authorization from your clients — so you can charge on file manually, without ever chasing anyone for a card.
This system captures card authorization — not the actual charge. You are collecting the information needed to run the card manually inside GHL when the time comes. This is built entirely with native GHL forms and workflows. No third party tools required beyond your existing GHL payment processor.
This is also a protection system. If you are on a phone consultation and recording the call, having this form completed by the client gives you written authorization on file in their contact record. God forbid you are ever hacked or disputed — you have it in writing.
What this system actually does
When a client books a session, a workflow automatically sends her the Primary Card form. She fills out her card details and submits. The form redirects her immediately to the Secondary Card form where she fills out a second card. Both sets of card information land directly on her GHL contact record.
After that, whenever you are ready to charge her — for her retainer, her final balance, anything — you open her contact record, find her card information, and run the charge manually inside GHL using the stored payment method. No phone tag. No chasing. No waiting.
Once the payment is processed you fire her contract automation. Everything is in order: card authorized, payment collected, contract sent automatically. Chefs kiss.
This is how a studio runs when it is actually automated. Card on file before the session. Charge when ready. Contract fires automatically after.
Why two cards on file
Cards decline. It happens constantly. HSA cards, gift cards, cards that hit their limit mid-payment-plan, cards that expire between sessions. When a primary card declines and you have no backup, you are back to chasing the client.
Requiring two cards on file means that when the primary declines, you move to the secondary without any client communication needed until after the charge succeeds. It protects your cash flow and eliminates one of the most annoying parts of running a studio.
The card you charge first for every payment. Retainer, installments, final balance — all hit this card first. Includes full name, email, phone, ZIP, last four digits, card type, and the full payment method via GHL's secure card capture.
The backup card you charge if the primary declines. Same information collected. Stays on the contact record. Never used unless needed — but always there when it is.
The two GHL forms
Both forms are built inside GHL natively. Here is exactly what each one collects and what it looks like.
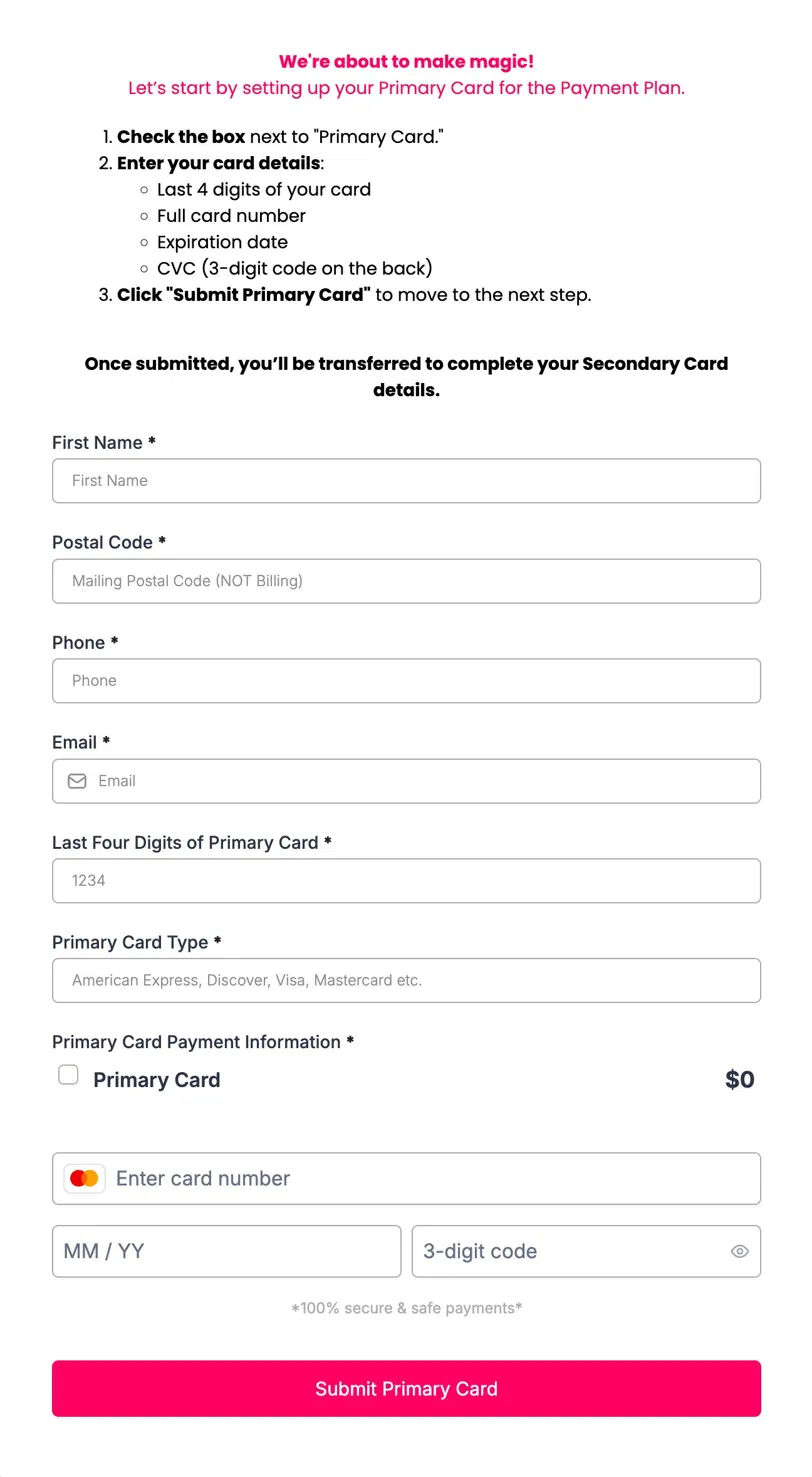
First Name · Postal Code (mailing, not billing) · Phone · Email · Last Four Digits of Primary Card · Primary Card Type (Visa, Mastercard, Amex, Discover, etc.) · Primary Card Payment Information (GHL secure card capture element — full card number, expiration, CVC)
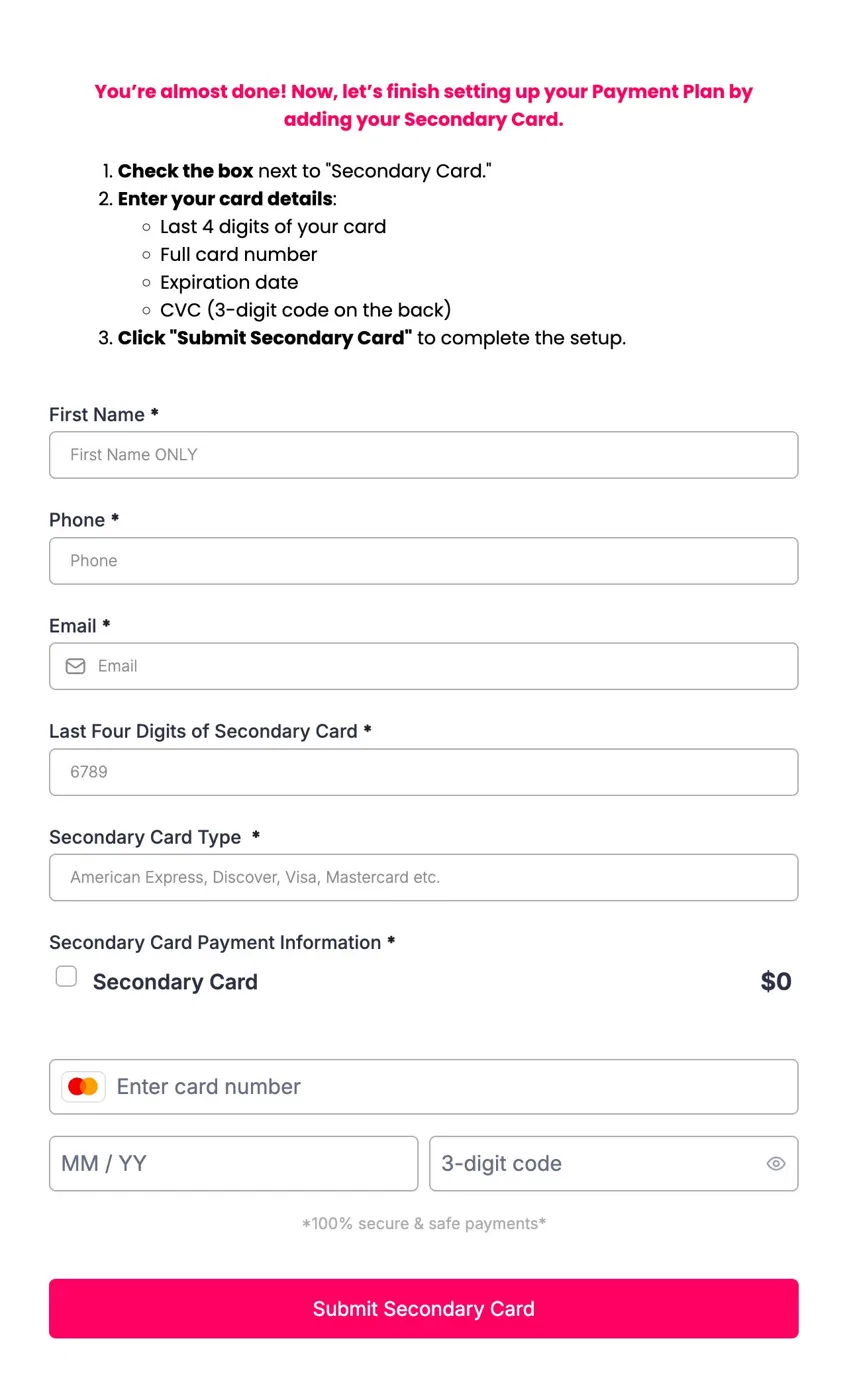
First Name (first name only) · Phone · Email · Last Four Digits of Secondary Card · Secondary Card Type · Secondary Card Payment Information (GHL secure card capture element)
How the full flow works
Here is the entire system from booking to payment to contract, in order.
Building the forms in GHL
Both forms are built inside GHL under Sites → Forms. Here is how to build the Primary Card form. Then duplicate it for the Secondary Card form and make the small changes.
Build the Primary Card Form
- 01In GHL go to Sites → Forms → New Form
- 02Name it Primary Card Authorization
- 03Add a Text element at the top. This is your instruction copy — paste the heading and numbered instructions you see in the form screenshot above. Style it with your brand colors.
- 04Add these fields in order: First Name · Postal Code (custom text field, label "Mailing Postal Code — NOT Billing") · Phone · Email
- 05Add a custom text field labeled "Last Four Digits of Primary Card" with placeholder "1234"
- 06Add a custom text field labeled "Primary Card Type" with placeholder "American Express, Discover, Visa, Mastercard etc."
- 07Add the Payment element. Label it "Primary Card Payment Information." Set the amount to $0 — you are authorizing, not charging. Make sure the checkbox is visible so the client has to check it to confirm.
- 08Set the submit button text to "Submit Primary Card" — style it with your brand color (hot pink in the example)
- 09Under Form Options → On Submit, set the redirect URL to your Secondary Card form URL. This redirects automatically after she submits.
- 10Save and publish the form. Copy the share URL — you will need it in the workflow.
Build the Secondary Card Form
- 01Duplicate the Primary Card form and rename it Secondary Card Authorization
- 02Update the instruction text to match the secondary card copy (see screenshot above)
- 03Remove the Postal Code field — secondary form only needs First Name, Phone, Email
- 04Change the field labels from "Primary Card" to "Secondary Card" throughout
- 05Change the Payment element label to "Secondary Card Payment Information"
- 06Change the submit button to "Submit Secondary Card"
- 07Set the On Submit redirect to a thank you page or back to your main site — she is done after this
- 08Save and publish. Copy the URL — this is the redirect target from the Primary Card form.
Now that you have the Secondary Card form URL, go back into the Primary Card form settings and paste it as the On Submit redirect. The two forms are now chained — one leads directly into the other.
Redirect from form 1 to form 2
You do not need a funnel for this. The forms redirect to each other natively using GHL's On Submit redirect setting. Here is exactly where to find it.
- 01Open your Primary Card form in the GHL form builder
- 02Click Options or the gear icon in the form builder
- 03Find On Submit Action or Thank You / Redirect URL
- 04Select Redirect to URL and paste your Secondary Card form share URL
- 05Save. Done. When she submits the first form she lands directly on the second one.
You can also build this inside a GHL funnel if you want more control over styling and branding. Create a funnel with two pages — Primary Card on page one, Secondary Card on page two. The funnel naturally advances from page one to page two on submit. Either approach works. The standalone forms are simpler to set up and maintain.
Update primary card workflow
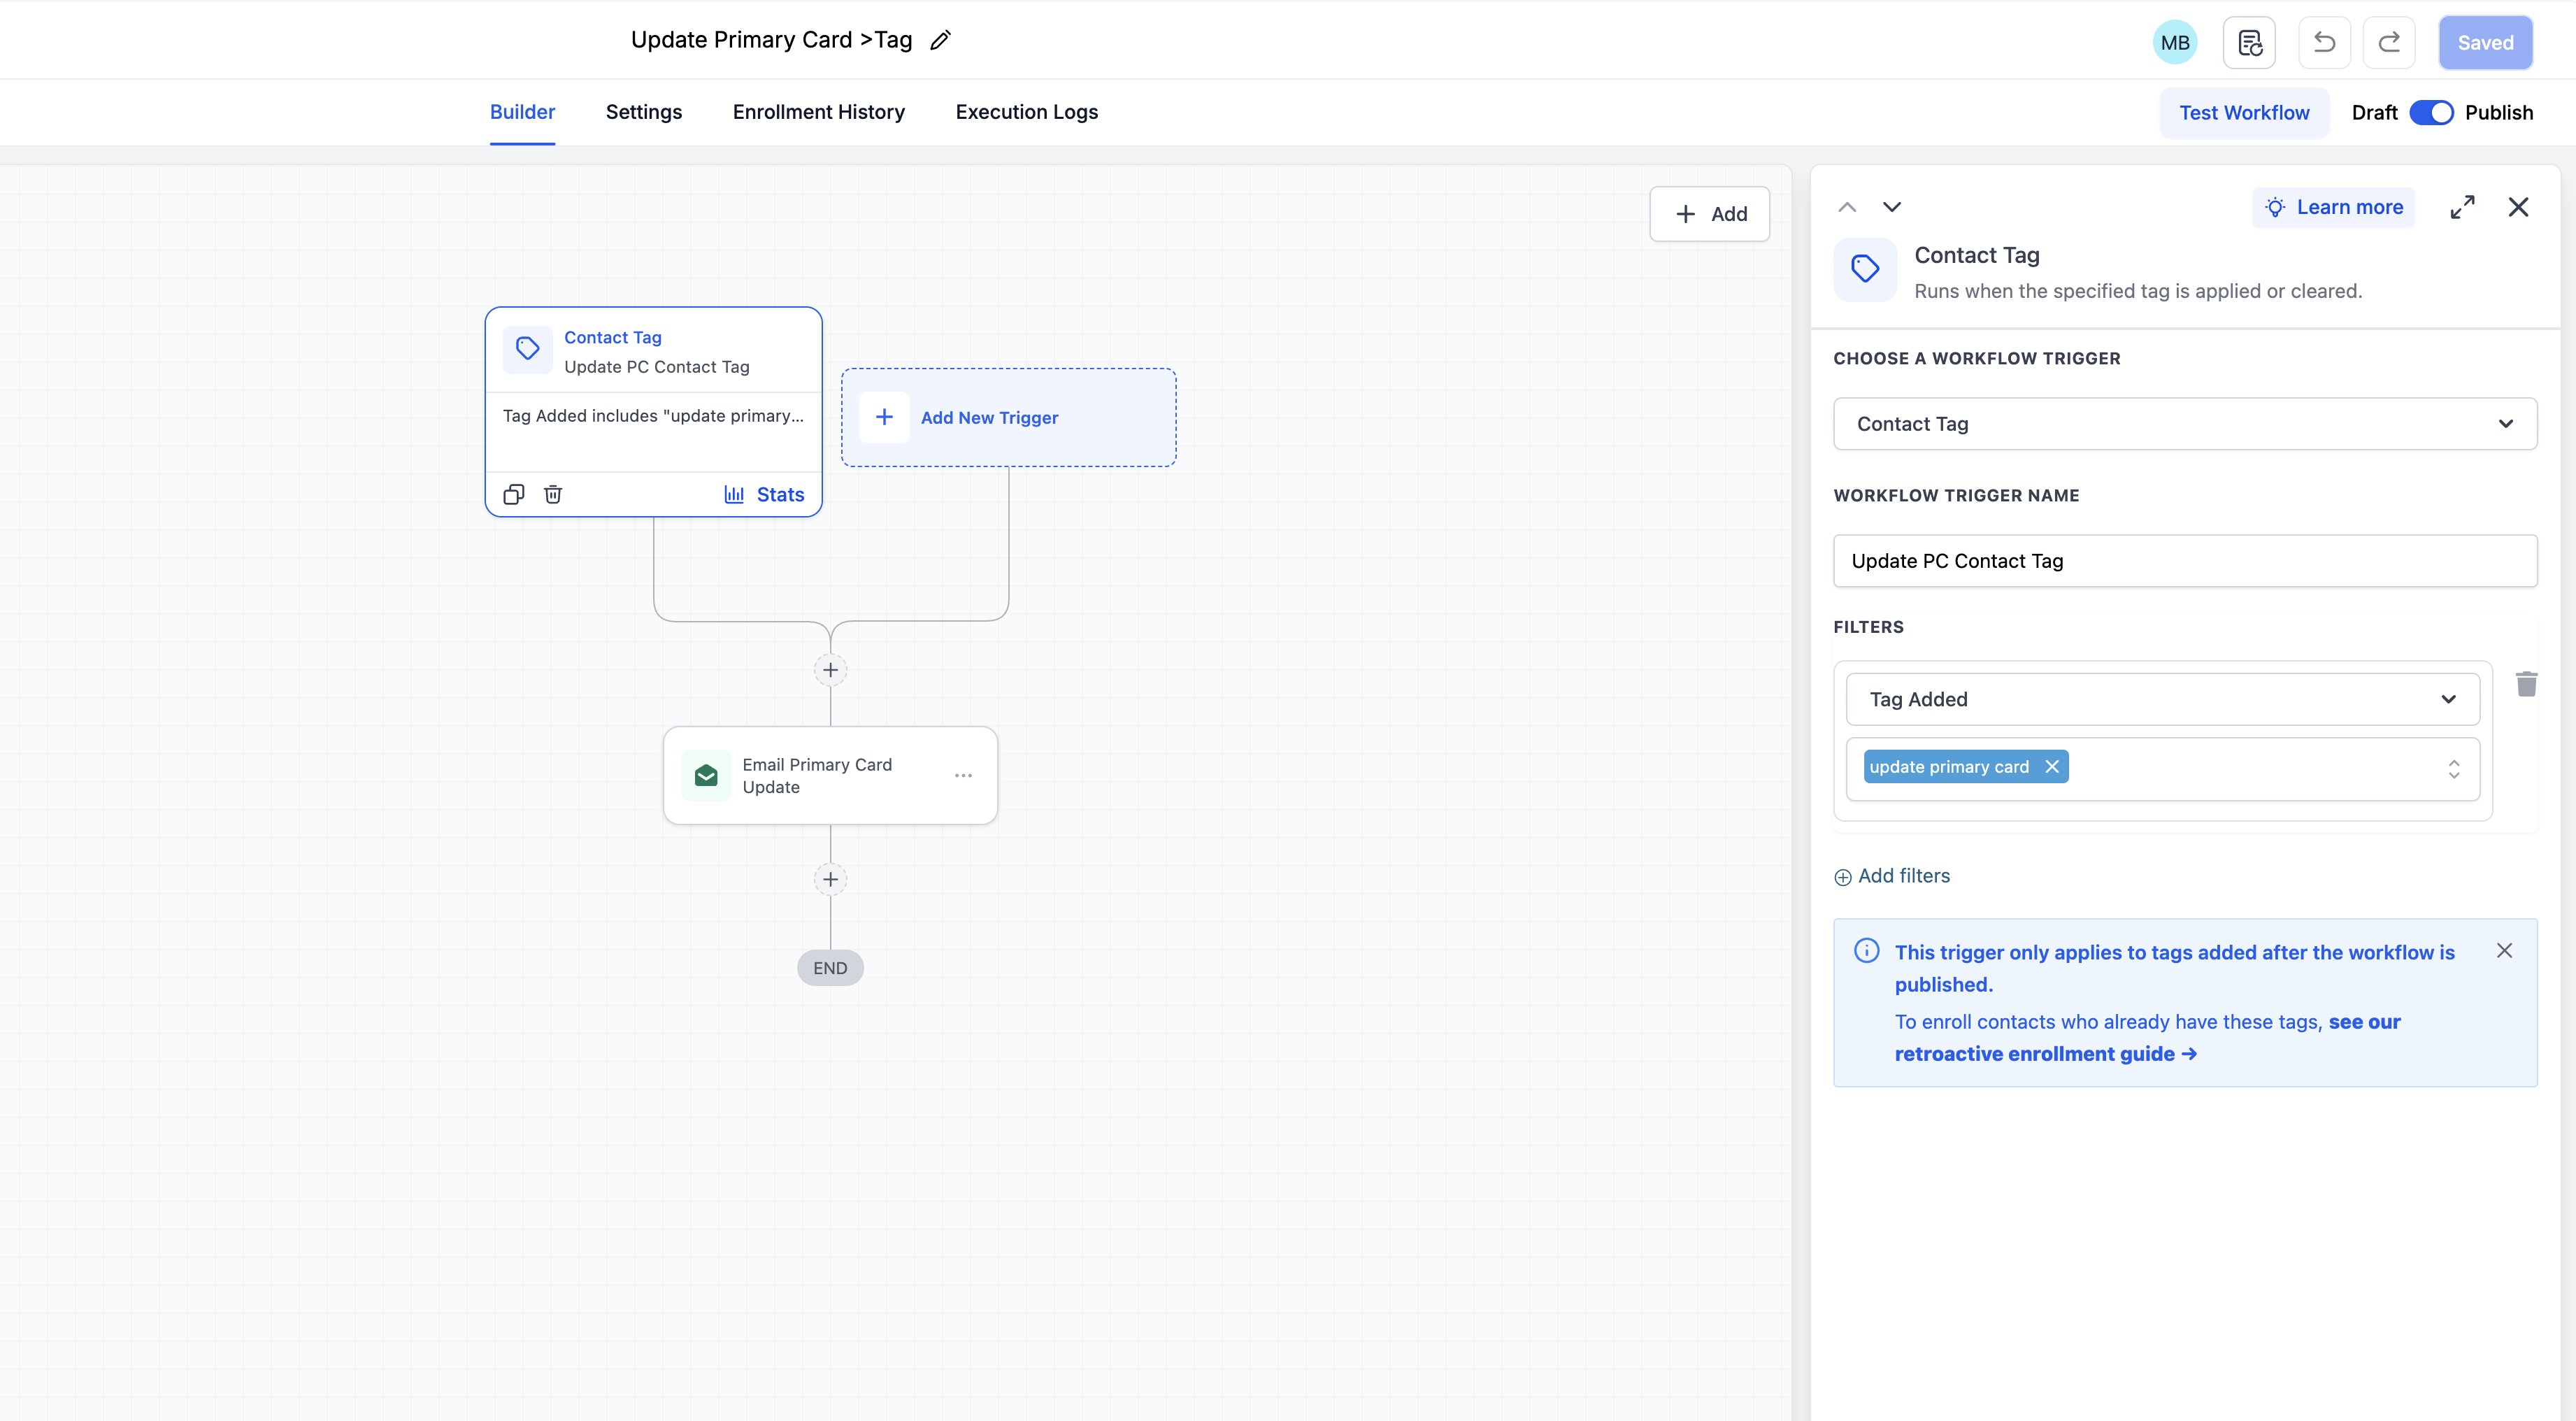
This workflow handles the situation where a client needs to update her card — new card, card expired, card lost, anything. You add a tag to her contact and an email fires automatically with the Primary Card form link. She updates. Her new card saves directly to her record.
Build the workflow
- 01In GHL go to Automations → Create Workflow
- 02Name it Update Primary Card
- 03Set the trigger to Contact Tag → tag added → Update Primary Card
- 04Add an action: Send Email — use the template below as your starting point
- 05The email contains the Primary Card form link. Keep it short and direct — see the email template screenshot below.
- 06Add a final action: Remove Tag → remove Update Primary Card from the contact. This allows the workflow to fire again next time the tag is added.
- 07Save and Publish the workflow
Whenever a client needs to update her card, open her contact record in GHL and manually add the tag "Update Primary Card." The workflow fires immediately. She gets the email. She submits the new card. It saves to her record. You never had to call or text her.

This email goes out whenever a client's card needs updating. Keep it short, warm, and direct. Something like: "Hey [First Name], your payment card on file needs to be updated. Click the link below to securely update your card information. It only takes a minute." Then the link to the Primary Card form. That is all it needs to be.
Booking trigger workflow
This workflow fires automatically when a client books a session. It sends her the Primary Card form before you ever speak to her again. By the time her session date arrives, her cards are already on file.
- 01In GHL create a new workflow or add to your existing booking confirmation workflow
- 02Set the trigger to whatever fires when she books — Appointment Created, a form submission, a pipeline stage change — whatever your booking flow uses
- 03Add a Send Email action with your card authorization request. Include the Primary Card form link. Tell her this is required before her session and explain why — protection for both of you.
- 04Optional: add a wait step and a follow-up SMS if she has not completed the form in 48 hours
- 05Save and Publish
This fires before the session. Before you record the consultation call. Before you invest time in her. Having the card on file gives you protection from the start — and it signals to her that this is a professional studio that handles payment properly.
Manually running the payment
When it is time to charge a client — retainer, installment, final balance — here is how to run it against the stored card inside GHL.
- 01Open the client's contact record in GHL
- 02Find her payment method stored from the Primary Card form submission
- 03Create an invoice or payment request for the amount you are charging
- 04Charge against her stored card. If it declines, move to the Secondary Card.
- 05Once the payment succeeds, your contract automation fires automatically
This system works with Noomerik which runs on NMI and is activated inside GoHighLevel. The stored card payment feature is available through your GHL payment settings. If you are unsure how to run a stored card charge, contact GHL support or your Noomerik account rep — the flow is specific to how your processor is connected.
The contract automation
Once payment is collected, your contract sends automatically. This is the part that makes the whole system feel effortless — you charged the card, you did not send anything, and she received her contract.
The contract automation is built in Workflow 003 (Contract and Retainer) inside The Vault. If you have not built that workflow yet, go there first. The SecurePay Card Vault works best when chained into your existing booking automation sequence.
When everything is connected, a new client booking triggers: card authorization request → cards stored on file → session prep workflow fires → payment charged manually at the right time → contract sends automatically → session happens → reveal workflow fires. You are running a studio on autopilot.